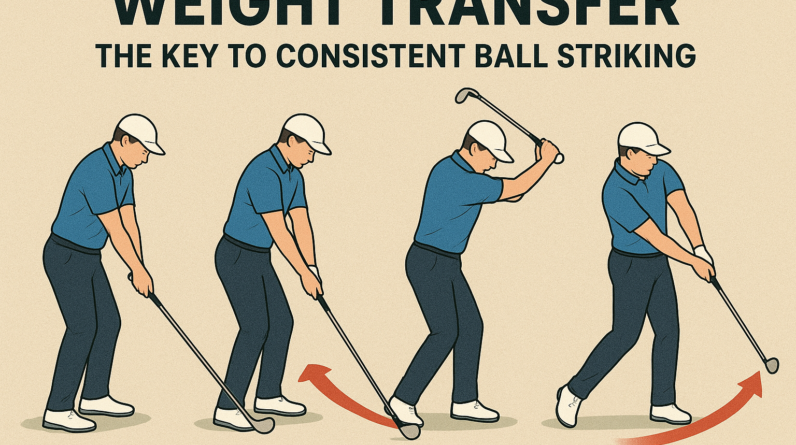

Weight Transfer: The secret to consistent ball striking
As a PGA professional, I see many golfers struggle with solid contact because they aren’t transferring their weight correctly through the swing. The single concept below keeps you grounded, balanced, and into a powerful, repeatable impact.
What the concept is
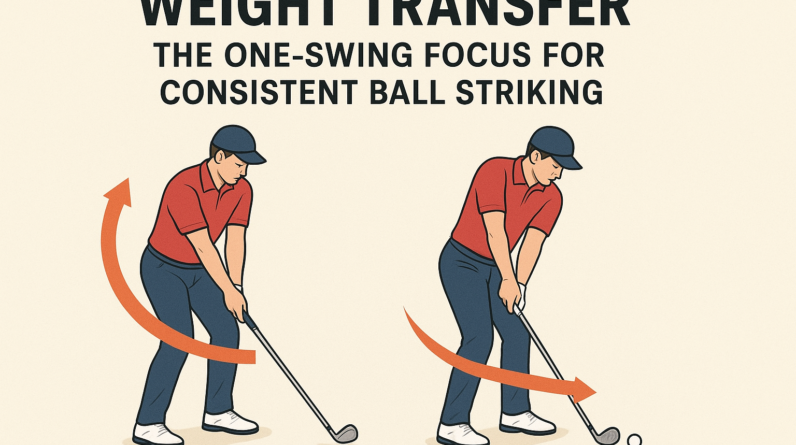
Weight transfer is the smooth shift of your body’s weight from the trail foot (the right foot for right-handed players) to the lead foot (the left foot) during the downswing and through impact. It’s not about “lifting the front foot” or a big hop—it’s a controlled, directional shift that helps the arms reach the ball with the correct path and the clubface square to the target at impact. Think of your body as a lever: the weight moving onto the lead side is what powers the clubhead toward the ball.
Why it matters to the golf swing
- Better contact: a solid weight transfer produces clean, centered strikes (not fat or thin shots).
- Consistent ball flight: when energy moves through the process in the right order, you’ll see more reliable launch and spin numbers.
- Injury prevention: staying balanced reduces compensations in the spine and joints.
What the golfer should feel when done correctly
- A steady, audible “pressure shift” toward the lead foot as you move from the top of the swing into impact.
- Body weight gradually and smoothly moves from the trail foot to the lead foot, with the lead knee and hip guiding the transition.
- Balance in the finish, with most of your weight on the lead foot and your chest facing the target.
2–3 common mistakes and how to fix them
Mistake 1: Weight stays on the back foot throughout the swing
Fix: Feel like you’re “stepping into the shot.” During the downswing, actively push the trail hip toward the target and allow your lead foot to take the weight gradually. A simple cue is to imagine you’re stepping forward into the ball with your left foot as you swing. Practice with your feet closer together at home to learn the feeling, then widen back to your normal stance on the range.
Mistake 2: Weight shifts too early (before or at the start of the downswing)
Fix: Delay the transfer until the downswing is well underway. Think “hips then hands”—the hips initiate the move, then the torso, then the arms. A good visual cue is to keep most of your weight on the trail foot until you feel the hips “unwind” and then allow the lead foot to take over as you approach impact.
Mistake 3: Lateral slide rather than rotational weight transfer
Fix: Focus on rotating the hips toward the target instead of simply sliding sideways. A small, controlled hip turn consistent with your spine angle keeps the transfer efficient and helps prevent an outside-to-inside path. Practice with a fixed-feet drill (feet stay relatively planted) and emphasize a rotation-first sequence rather than a big lateral move.
One easy drill you can do at home or on the range
Step-Through Weight Transfer Drill
- Set up in your normal address position with a mid-iron.
- Without a ball, take your backswing and pause at the top for a moment.
- On the downswing, shift your weight toward the lead foot and take a small step forward with the lead foot as you would in a real swing. Your weight should flow from the trail foot to the lead foot while your chest remains softly tilted toward the target.
- Finish tall with your chest facing the target and most of your weight on the lead foot.
- Do 2 sets of 10 slow, intentional reps, then add a ball and scale to a comfortable tempo.
Tip: video yourself or use a mirror to verify that you’re not swaying or jumping, and that the step is a controlled, purposeful transfer rather than a lunge.
By focusing on a steady weight transfer, you’ll notice better contact, more consistent trajectories, and repeatable results across a wide range of clubs. If you want, I can tailor this drill to your current swing and assessment—just tell me your typical ball flight and the clubs you use most.
Weight Transfer: Teh Secret to Consistent Ball Striking
What is weight transfer and why it matters
Weight transfer refers to the purposeful shifting of body weight from one part of the stance to another during a swing or shot. In ball-striking sports, the efficiency of this transition directly impacts clubhead speed, contact quality, and shot accuracy. Proper weight transfer optimizes the timing of energy delivery by coordinating the ground reaction forces with hip and torso rotation. When done well, it creates a stable, powerful strike zone and reduces the risk of fat shots, thin hits, and off-center contact.
Think of weight transfer as a controlled flow of momentum: you start with gravity and balance supporting you,then you direct that momentum through the kinetic chain—from the ground up through the legs,hips,core,and finally the arms and club. The key is a smooth, sequential shift rather then a guess-and-hope movement. the result is better distance control, improved repeatability, and more solid contact under pressure.
Biomechanics in plain terms
In many ball-striking disciplines, the back foot loads first, then the weight travels toward the front foot as the strike approaches.The hips rotate, the torso and shoulders square up to the target, and the arms release with the clubface in the proper position. The exact timing varies by sport, but the underlying principle remains: a well-timed transfer from back to front supports power, control, and consistency.
Why it matters for consistency
- Contact quality improves as the center of gravity moves toward the sweet spot on the clubface.
- Impulse is better aligned with the target line, reducing lateral misses.
- Balance is maintained through the swing, minimizing recovery time after impact.
- Repeatable patterns emerge when cues anchor the transfer sequence.
How weight transfer works in golf
Golf is a quintessential example of weight transfer in action. The swing sequence typically involves loading onto the trail leg (the right leg for right-handed players) during the backswing, then transitioning the weight forward through the downswing to deliver maximum energy at impact. A well-timed transfer keeps the head relatively steady, maintains posture, and helps the hands release at the correct moment.
Key phases of the golf weight transfer
- Address and setup: Balance is centered over the arches of both feet. A slight knee flex and a athletic posture set the stage for a smooth transfer.
- Backswing loading: The majority of weight shifts to the trail side,aided by hip rotation and a small posterior tilt of the spine.
- Transition to downswing: The trail foot remains grounded while the hips start to rotate toward the target. the torso and arms follow in sequence.
- Impact: Weight arrives toward the front foot, the body angles are maintained, and the hands release in line with the target path.
- Follow-through: The majority of force continues through the front foot, with the weight finishing in front of the led foot to ensure balance and control.
Cues that help you feel the transfer
- “Touch the back foot to start the swing, then volley the weight toward the front leg.”
- “Feel pressure build on the inside of the trail foot during the backswing.”
- “punch through the ball with the lead foot as you rotate the hips.”
- “Stay aggressive with the hips, not just the arms.”
Practical drills to train weight transfer
Drills that emphasize sequencing and feedback are the fastest way to engrain smooth weight transfer. Perform thes with a disciplined tempo, starting with slow practice and progressing to full speed as your body cues improve.
Drill 1: step Drill (floor-based)
- Stand with feet hip-width apart, a golf club or trainer in hand.
- Take a small step toward the target with your lead foot during the backswing, then step into the impact position, feeling the weight move from the trail foot to the lead foot.
- Focus on maintaining balance and keeping the head steady as the weight shifts.
Drill 2: 3-Point drill (static balance)
- Stand with feet shoulder-width apart. Place a small object under the outside edge of your lead foot to encourage a stable heel-to-toe transfer.
- Shallow backswing and a controlled downswing, concentrating on a clear transfer from back to front foot.
- Hold impact for a beat to feel the weight settle in the lead foot.
Drill 3: Pause at Top,Re-Engage
- Take a normal backswing,but pause at the top for 1–2 seconds.
- As you begin the downswing, initiate weight transfer immediately and visualize the trail-to-lead transition.
- Resume the swing with a smooth,powerful strike.
Drill 4: Slow-Motion Progression
- Perform swings in slow motion to emphasize sequencing: load, transfer, strike, release.
- Gradually increase tempo while maintaining the same transfer rhythm.
Drill 5: Foot-Pressure Awareness
Use a simple foot pressure map or audio feedback (like a training mat or sensor) to hear/feel when weight leaves the back foot and lands on the front foot during impact.
Weight transfer across sports: golf, tennis, soccer, and more
While the core idea remains the same, each sport emphasizes weight transfer a little differently due to hold times, equipment, and movement patterns.
Golf vs. tennis vs. soccer
- Golf: A controlled,multi-segment transfer that culminates in a stable finish.The emphasis is on sequencing, balance, and clubface control at impact.
- Tennis: A rapid, reactive transfer driven by lateral movement and split-step timing. Weight shifts quickly from preparation foot to the hitting foot, with emphasis on racket control and contact point consistency.
- Soccer: A dynamic transfer involved with foot contacts and ball striking off either foot. Weight transfer is often driven by pause-and-release mechanics for powerful shots and accurate passes.
Baseball and other throwing/striking actions
In baseball and similar throwing motions, weight transfer is tightly choreographed with trunk rotation and arm action. A well-timed shift from the back leg to the front leg supports velocity while maintaining control and reducing strain on the back. Training should integrate core stability, hip mobility, and leg drive for durable performance.
Common mistakes and how to fix them
- Too much weight staying on the back foot: Fix by emphasizing a progressive forward path and practicing a deliberate shift to the lead foot with slow tempo.
- early extension (hips sliding forward before impact): Work on posture maintenance and hip rotation to keep the torso over the center of gravity through impact.
- Excess lateral sway without forward transfer: Use a video cue or mirror to ensure the hips rotate rather than slide laterally.
- Helmet-on-ball feeling (over-rotation or casting the hands): Focus on sequencing: hips first, then torso, then arms, to create a clean strike path.
- Lower-body misalignment leading to off-center contact: Check stance width, knee flex, and foot angle; small adjustments can align the strike plane with the target.
First-hand experiences and case studies
Real-world examples help crystallize how weight transfer changes outcomes on the course or court. Here are two concise, illustrative anecdotes anchored in practical learning.
Case study 1: Amateur golfer drops handicap by syncing weight transfer
A mid-handicap golfer reported inconsistent contact and distance control. After incorporating a simple cue—“load the back foot, then drive through the lead foot”—and practicing the 3-point Drill, they noticed a steadier strike line and a 10–15 yard gain in carry. Video feedback showed better pelvis rotation timing and a smoother transition from backswing to downswing, reducing the tendency to flip the hands at impact.
Case study 2: Tennis player improves consistency on flat serves
A recreational tennis player struggled with flat serves going long and wide. By focusing on weight transfer through the legs and a deliberate forward weight shift at contact, they achieved more consistent contact points and improved serve accuracy. Drills emphasizing swift, controlled shifts and balance helped transfer energy more efficiently from the ground up to the racquet.
Quick reference: Weight transfer phases and cues
| Phase | Purpose | Key Cues | Common Error | Drills |
|---|---|---|---|---|
| Address | Set a balanced starting point | Centered, slight knee flex, light squeeze | Stale posture, weight too even | Posture check, mini-backswing holds |
| Backswing loading | Load weight to trail side | Feel trail-foot pressure | Over-rotation without weight shift | Backswing pause, weight-to-trail drill |
| Transition | Initiate downswing with hips | Hip rotation precedes hands | ||
| Impact | Weight over lead foot for solid contact | Lead foot pressure, stable torso | Over-rotation or flipping | Slow-motion impact drill |
| follow-through | Finish with balance and control | Weight finished in front of lead foot | Hasty deceleration | Full-speed reps with balance focus |
Practical tips for daily practice
- Record short video clips from the side to assess the transfer sequence. Look for a clear trail-to-lead weight shift without excessive lateral sway.
- practice with purpose: combine a tempo cue (slow to moderate tempo) with the weight transfer cues to reinforce muscle memory.
- Use drills that isolate the lower body to avoid over-reliance on the arms. The legs should drive the initiations of rotation and energy transfer.
- Progress from control to speed. Start slow, focus on form, then gradually increase velocity while maintaining proper transfer.
- Balance training should accompany swing practice. A stable core and ankle strength support a consistent weight transfer pattern.
Key takeaways for consistent ball striking
- Weight transfer is a deliberate,timed shift from the back foot to the front foot that powers the strike.
- Sequence matters: load with the trail leg, rotate the hips, then deliver energy through the lead foot at impact.
- Use cues and drills to build muscle memory and reduce reliance on guesswork during a shot.
- Adapt the transfer concept to your sport,recognizing unique demands like faster tempo in tennis or explosive drive in soccer.