Weight Transfer: The Key to Consistent Ball Striking
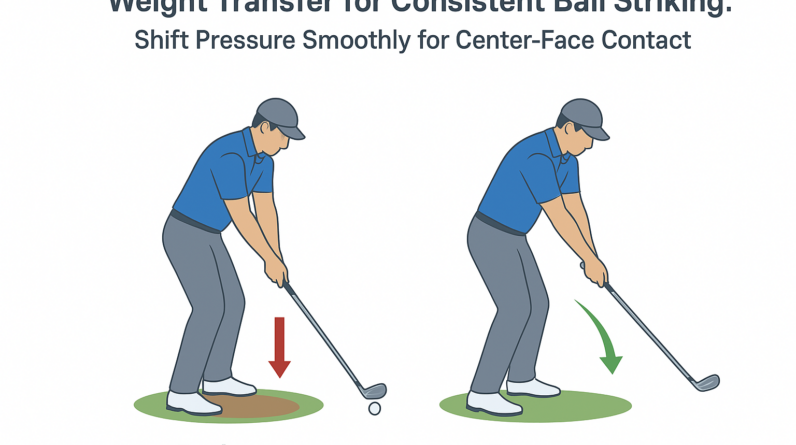
Weight transfer is the deliberate moving of your body’s weight from the trail leg to the lead leg during the swing. It isn’t about cranking your hips or rushing through the ball—it’s about the sequence of your body turning and posting your weight so you can strike the ball cleanly and with consistent direction.
What the concept is
In a right-handed golfer, start with most of your weight on the right foot. As you take the club back, your hips and chest rotate, and your weight gradually shifts toward the inside of the right foot. As you descend and rotate toward the target, your weight continues to move forward, finishing with the majority on the left foot. Think of it as a smooth arc of center-of-m gravity from back toward the target, not a sudden slide or jump off the ball.
Why it matters to the golf swing
- Improves contact: a forward, balanced finish helps you strike the center of the face more often.
- Stabilizes the club path: proper transfer promotes a consistent path through impact.
- Enhances power and control: using the ground to drive the swing helps you generate speed without losing balance.
- Reduces common mis-hits: too much sway or staying back often leads to fats, thins, or off-target shots.
What you should feel when doing it correctly
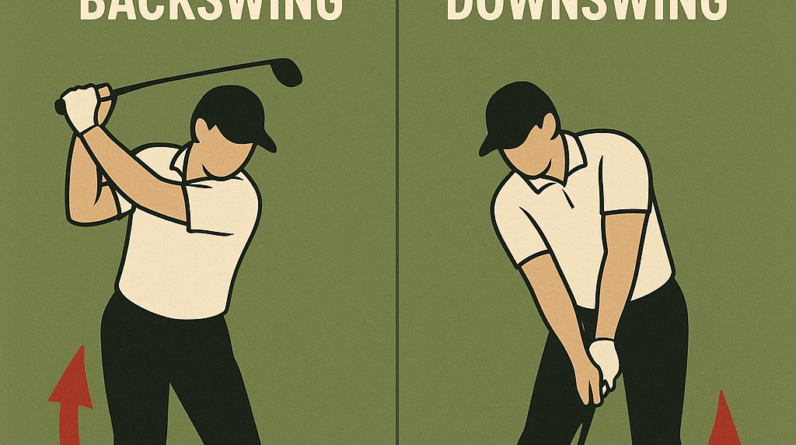
- In the backswing, you feel pressure gradually building on the inside of your right foot as you turn your hips and shoulders.
- At impact, you sense your weight moving toward the inside of your lead foot (left foot for a right-handed golfer), with your chest facing slightly toward the target.
- In the finish, most of your weight sits on the lead foot, and your spine tilts slightly toward the target to stay balanced.
2–3 common mistakes and simple fixes
- Mistake 1: Excessive sway to the right (trail-side slide) during the backswing and through impact.
- Fix: Rotate the hips and torso instead of sliding. Feel the right knee flex and the right hamstring work to turn you, not your lower back pushing you sideways.
- Mistake 2: No weight transfer—weight stays on the trail foot too long, causing thin or fat shots.
- Fix: Initiate the downswing with a turning of the hips toward the target and a gradual transfer of pressure into the lead foot. Maintain good knee flex and keep the head steady over the ball.
- Mistake 3: Early weight transfer to the lead foot before impact, which can rob width and speed.
- Fix: Allow the trail foot to maintain some ground contact through the early downswing. Finish with a balanced weight shift and a solid, athletic finish on the lead foot.
One easy practice drill you can do at home or on the range
Step-Through Drill: This drill trains the sensation of moving your weight forward without losing balance.
- Setup a normal addressing stance and keep your feet close together at first (to feel the balance).
- Make a half swing back, then swing down and, at impact, step forward with your lead foot into a comfortable stride. Your back foot should naturally lift during the follow-through as you finish with weight on the lead foot.
- After each repetition, reset and repeat, focusing on a smooth transition from the trail foot to the lead foot and a balanced finish.
- As you improve, widen your stance slightly and increase the swing length while maintaining the same weight-forward feel.
Tip: practice this drill on carpet or a foam mat if you’re at home. The goal is to feel the forward weight shift and to finish balanced on the lead side.
weight Transfer: The Key to Consistent Ball Striking
Why Weight Transfer Matters for Consistency
In golf, weight transfer is more than just shifting your hips or leaning toward the target.It is indeed the deliberate, coordinated movement of your body’s mass from the back foot to the front foot during the swing. When performed correctly, weight transfer creates solid contact, improves power without sacrificing control, and reduces common flaws like fat shots, thin strikes, or inconsistency on mis-hit balls.
Think of weight transfer as the engine of your swing’s sequencing. The body’s weight acts like a moving fulcrum that stores and releases energy through the kinetic chain—from the ground up. A well-timed transfer helps you:
- Maintain a stable spine angle while generating rotational speed.
- Deliver the clubhead to impact with the right angle, face square to the ball, and consistent compression.
- Improve balance through the swing, wich translates into repeatable ball striking under pressure.
Key takeaway: without proper weight transfer, even strong players can struggle to reproduce thier best contact. With it, you gain a reliable rhythm that translates into distance control, higher greens in regulation, and fewer off-center hits.
how Weight Transfer Works in a Golf Swing
Setup and Stance: Foundation
The journey toward ideal weight transfer begins at setup. A balanced, athletic posture sets you up for a smooth transition from backswing to impact. Practical setup guidelines include:
- Distribute weight approximately 50/50 between the lead (left for right-handed players) and trail foot, with a slight bias toward the inside of the midfoot.
- Align your hips and shoulders parallel to the target line, maintaining a modest knee flex and a agreeable spine angle.
- Let the ball position align with your club: a typical setup is mid-stance for irons and slightly forward for hybrids and woods to encourage a clean contact window.
- Keep your head steady and eyes on the ball, avoiding early lateral movement.
Why this matters: a solid foundation minimizes wasted energy during the transition and makes it easier to transfer weight toward the target without collapsing or swaying.
The Load and Transition: back Swing
During the backswing, most of the initial energy should store in the trail side (the right leg for right-handed players). the goal is to create a controlled, load-driven turn rather than a brute force swing. Key elements of the load phase:
- Shifting pressure to the trailing foot gradually,while maintaining spine angle and posture.
- Rotating the hips and shoulders together to create a coil or “load” that will be released through impact.
- Keeping the lead leg firm enough to anchor the body while the trail knee flexes slightly to absorb the turn.
Common cue: imagine your hips turning toward the target while your upper body “thread the needle” through the ball. The emphasis is on timing and feel, not raw speed.
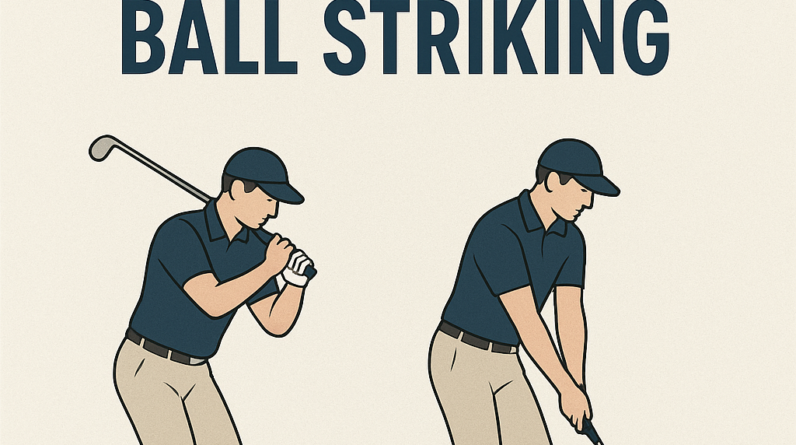
downswing to Impact: Transfer and Release
This is the critical moment where weight transfer becomes visible in your ball flight. A synchronized sequence—hips clearing, torso unwinding, and hands leading—powers a clean strike. Practical points for the downswing:
- initiate the downswing from the ground up: pivot through the ankles and knees, then allow the hips to rotate toward the target.
- Force the weight forward from the trail foot onto the lead foot, ideally by the time the club reaches the clubface at impact.
- Keep the wrists hinged until contact, then release through impact to maintain speed and control.
- Maintain balance after impact by allowing the torso to rotate naturally toward the target and the feet to settle into a stable finish.
Impact position perfection looks like a slight forward tilt of the spine, solid lower body support, and the center of mass aligned to the lead side.When done well, you’ll notice consistent contact and a predictable ball flight.
Post-Impact and Recovery: Balance and Rhythm
After impact, the body recovers in a way that reinforces repeatable weight transfer for the next shot. Your finish should reflect a well-controlled transfer rather than a stumble or a sudden stop. Consider these cues:
- Finish with weight mostly on the lead foot, comfortably balanced.
- Allow the body to unwind naturally without forcing the spine into a forced position.
- Maintain a relaxed grip and loose arms so the next swing starts without hesitation or hesitation in the weight shift.
bottom line: a smoothly executed transfer not only improves single-shot quality but also resets your rhythm for the next strike, making your whole round more consistent.
Practical Drills to Train Weight Transfer
Drills are your best friends when building a reliable weight transfer. Below are practical, repeatable exercises that promote a better sense of ground reaction forces and sequencing.Practice slowly first, then add speed as your body learns the pattern.
- Feet-Together Drill — Stand with feet together and take half-swings, focusing on keeping weight centered. Progress to full swings while maintaining a balanced finish on the lead foot.
- Step-Through Drill — Start with feet together. On the backswing, shift weight to the trail foot; on the downswing, step toward the target with the lead foot as you strike the ball. This reinforces the forward weight transfer through impact.
- 90/60 drill — Aim to feel 90% of your weight on the trail foot at the top of the backswing and 60% on the lead foot at impact. This helps you sense the timing of the transfer rather than guess it.
- Ball-Position Progression — Place the ball progressively forward in your stance (from mid-stance to slightly forward). This setup shift encourages a more natural weight transfer into the lead side at impact.
- Balance-Board Feedback — If you have access to a balance board or a simple kitchen scale, practice swings while monitoring how much pressure you place on each foot. Goal: a smooth, controlled transfer rather than abrupt stomps.
- slow-Motion to Real-Speed — Start with 50% speed focusing on weight transfer,then gradually increase to full speed while maintaining the same transfer pattern.
Common Mistakes and Fixes
Even seasoned players fall into weight-transfer traps. Here are the most common issues and practical fixes you can apply during practice sessions:
- Swaying or sliding laterally — Fix: imagine the torso and hips rotating around a fixed spine; gently post the trail leg to prevent excessive lateral movement. Drills: Feet-Together, 90/60.
- Early extension — Fix: keep your spine angle by feeling you’re “staying tall” through impact; practice with a towel under the armpits to discourage early arm folding.
- Premature weight shift to the lead foot — Fix: pause slightly at the top of the backswing and feel the weight loading into the trail foot before transferring forward on the downswing.
- Reverse weight transfer on long clubs — Fix: use slower tempo and smaller back-swing while reinforcing the idea of loading and then releasing forward into the lead side.
- Inconsistent pressure on the lead foot at impact — Fix: practice with slow motion, monitor pressure distribution with simple foot awareness drills, then apply to full-speed swings.
Case Studies: Real-World Examples
Case Study 1: Amateur golfer improves contact and distance
Alex, a mid-cap player, struggled with fat shots and inconsistent contact. After focusing on a deliberate weight transfer sequence—loading the trail foot in the backswing and transferring to the lead foot by impact—Alex saw a dramatic advancement in center contact. Within six weeks, the player moved from an inconsistent 60% on the lead foot at impact to consistent 75–80%, with a noticeable increase in roll and distance. The change also reduced miss hits on tight fairways, translating into more greens and lower scores.
Case study 2: competitive junior player refines swing sequencing for tighter dispersion
A junior player transitioning to higher-level competition faced issues with early release and spread-out dispersion. By emphasizing a controlled weight transfer and a more pronounced hip torque synced with the downswing, the player achieved tighter shot grouping and better carry distance. In competition rounds, the improved transfer pattern contributed to several rounds under par and a stronger mental rhythm when under pressure.
First-Hand Experience: A Coach’s Outlook
from coaching hundreds of golfers,I’ve learned that weight transfer isn’t just a physical action—it’s a mental cue that anchors your swing. When players focus on feeling the trail foot loading during the backswing and then guiding that energy toward the lead foot at impact, the clubface naturally finds its path more consistently. A simple but powerful cue I use is: “Tap the trail foot, then ride it forward.” This reminder helps players stay connected to the ground and avoid “air swings” where weight doesn’t truly transfer. The result is better strike quality, a more stable ball flight, and greater confidence on the range and course.
Quick Reference: At-a-glance checklist
| Phase | Key Focus | Common Mistakes | Drills / Cues |
|---|---|---|---|
| setup | Balanced, athletic stance | Excess sway; uneven weight | Feet-together drill; ball-position check |
| backswing | Load on trail foot; coil | Early extension; over-rotation | 90/60 drill; slow-mo backswing |
| Downswing & Impact | Transfer to lead foot; solid impact | Premature weight shift; thin hits | Step-through drill; hinge-release cue |
| Finish | Balanced, high-quality finish | Collapsing on the lead side | Stable finish with weight on lead foot |
Additional Tips for Different Conditions
Weight transfer is influenced by club choice, course conditions, and weather. Tailor your approach as follows:
- Wet or soft turf: Transfer weight a touch more gradually to reduce the risk of digging or slipping.Maintain a softer front knee to absorb ground reaction forces.
- Firm turf or dry fairways: You can increase the urgency of the weight transfer a notch to maximize leverage without overcooking the timing.
- Shot shaping: For draws or fades, pay attention to how your weight transfer interacts with hand path and clubface control.Subtle adjustments to the timing can influence dispersion without sacrificing contact quality.
- Windy conditions: Maintain a steadier tempo to keep weight transfer predictable under gusts.Resist the urge to swing harder to compensate for wind.
Final Thoughts: Making Weight Transfer Your Default
Weight transfer isn’t a one-time fix—it’s a recurring pattern you train until it becomes your natural rhythm. By building the feeling of loading the trail side, sequencing the downswing, and finishing with balance, you create a reliable framework for consistent ball striking. Combine targeted drills,mindful practice,and feedback (video analysis or a coach’s notes) to convert theory into repeatable performance on the course.